
There’s something undeniably magical about sushi-the way the vibrant colors of fresh fish,crisp vegetables,and glossy rice come together in perfect harmony,wrapped delicately in seaweed. Yet,the thought of creating these culinary masterpieces at home can feel intimidating,reserved only for skilled chefs with years of training. What if we told you that rolling your own sushi is not only achievable, but also a fun and rewarding experience? In this article, “Roll your Own: Easy Steps to Perfect Sushi Rolls at Home,” we’ll guide you through simple, approachable techniques to master the art of sushi making in your own kitchen.Get ready to transform everyday ingredients into stunning, bite-sized works of edible art-no passport or fancy restaurant required.
Selecting Fresh Ingredients for Authentic Flavor and Texture
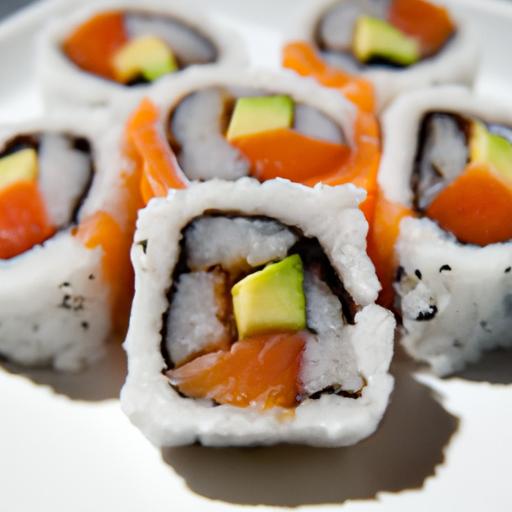
Roll Your Own sushi rolls at home begins with sourcing the freshest,highest-quality ingredients. the vibrant,clean taste of authentic sushi hinges on the integrity of each element-starting with the fish. Look for sashimi-grade fish from a trusted market with a bright, translucent appearance and a subtle ocean scent. Avoid anything that smells overly fishy or appears dull.
Next, choose short-grain sushi rice, which offers the perfect balance of stickiness and tenderness to hold your rolls together without becoming mushy. Fresh vegetables like crisp cucumber, creamy avocado, and sweet bell peppers provide delightful texture contrasts. Don’t overlook the importance of fresh nori sheets-look for those that are dark green/black and snap easily without bending.
Mastering the Art of Rice Planning and Seasoning
Perfect sushi rice is the cornerstone of any roll. Begin by rinsing your 1 ½ cups sushi rice under cold water until the water runs clear to remove excess starch, ensuring a fluffy texture after cooking. Cook it in a rice cooker or a tightly covered pot with 1 ¾ cups water, then allow it to rest off the heat for 10 minutes.
While the rice rests, prepare the seasoning by combining ¼ cup rice vinegar, 3 tablespoons sugar, and 1 teaspoon salt until dissolved. Gently fold this into the hot rice with a wooden paddle or spatula in a cutting motion to avoid crushing the grains. Spread the rice thinly on a flat surface or wide bowl to cool quickly, fanning it to achieve that signature shiny glaze and sticky but firm texture-essential for flawless rolling.
Essential Tools and Techniques for Flawless Rolling
With ingredients ready, your toolkit will elevate the sushi rolling process. A bamboo sushi mat is indispensable for uniform, tight rolls. Wrapping the mat in plastic wrap prevents sticking and allows easy cleanup. Using your hands dipped in a mixture of water and rice vinegar will help handle the sticky rice without frustration.
Lay the nori sheet shiny side down, spread an even layer of rice leaving a 1-inch border at the top edge, then layer your fillings thoughtfully along the bottom third. with steady pressure, roll the mat away from you, tightening as you go to create a sealed, cylindrical shape. Using a very sharp knife moistened and wiped between cuts will give you clean, neat slices with minimal squashing.
Creative Filling Combinations to Elevate Your Sushi Experience
Experimenting with fillings transforms your Roll Your Own sushi from simple to spectacular. Classic favorites like spicy tuna with creamy avocado or crab, cucumber, and mango bring freshness with a twist. For vegetarians, try pickled daikon, roasted sweet potato, and tempura asparagus for delightful texture and flavor harmony.
Adding a hint of crunch with toasted sesame seeds, tobiko, or tempura flakes on the outside adds depth and visual appeal. Finish with a drizzle of unagi sauce or a sprinkle of finely chopped chives to provide contrast and zing that awakens the palate.
Prep and Cook Time
- Preparation: 30 minutes
- Cooking rice: 25 minutes
- Rolling & assembly: 15 minutes
- Total Time: Approximately 1 hour 10 minutes
Yield
Makes 4 sushi rolls, approximately 32 pieces
Difficulty Level
Medium – Perfect for culinary adventurers eager to master a popular Japanese staple
Ingredients
- 1 ½ cups short-grain sushi rice
- 1 ¾ cups water
- ¼ cup rice vinegar
- 3 tbsp granulated sugar
- 1 tsp salt
- 4 sheets nori seaweed
- 200g sashimi-grade tuna or preferred fish, thinly sliced
- 1 avocado, sliced
- 1 cucumber, julienned
- 2 tbsp toasted sesame seeds
- Wasabi, pickled ginger, and soy sauce for serving
instructions
- Rinse the rice in cold water until clear, drain well.
- Cook the rice with 1 ¾ cups water in a rice cooker or pot; when done, let rest covered for 10 minutes off heat.
- Combine vinegar, sugar, and salt in a small saucepan over low heat just until dissolved; do not boil.
- Transfer rice to a large bowl,slowly fold in the seasoning with a wooden spatula using cutting motions. Fan while stirring to cool.
- Set up your rolling station with bamboo mat covered in plastic wrap,nori sheets,and prepared fillings.
- Place one nori sheet shiny side down, spread a thin, even layer of seasoned rice, leaving a 1-inch margin at the top.
- Arrange fillings along the bottom edge, sprinkle sesame seeds if desired.
- Roll the sushi using the bamboo mat with firm, even pressure towards you, sealing the edge with a dab of water.
- Slice rolls into 8 pieces with a moistened sharp knife, wiping blade clean between cuts.
- serve instantly with wasabi, pickled ginger, and soy sauce.
Chef’s Notes
- For an extra sticky rice texture, slightly undercook the rice by reducing water by 2 tablespoons.
- Use sashimi-grade fish only to ensure safety and freshness.
- Try substituting rice vinegar with apple cider vinegar in a pinch, but flavor will vary.
- Prepare sushi rice a few hours in advance and refrigerate covered with a damp cloth for best results.
- To avoid soggy rolls, pat vegetables and fish dry before rolling.
Serving Suggestions
Present your sushi rolls sliced on a sleek rectangular platter. Garnish with microgreens, edible flowers, or thinly sliced radishes for pops of color. Serve alongside small bowls of soy sauce, wasabi, and pickled ginger to enhance the tasting experience. Pair with chilled sake or a crisp Japanese beer for a truly immersive meal.
| Nutrient | Per Serving (4 pieces) |
|---|---|
| Calories | 210 kcal |
| Protein | 12 g |
| Carbohydrates | 32 g |
| Fat | 5 g |
Explore more sushi inspiration in our japanese Cuisine basics guide or deepen your knowledge about seafood safety through the FDA seafood safety guidelines.

Q&A
Q&A: Roll Your Own – Easy Steps to Perfect sushi Rolls at Home
Q1: Why shoudl I try making sushi rolls at home rather of buying them?
A: Making sushi rolls at home is not only a fun and creative culinary adventure but also lets you customize every bite to your liking. Plus, it’s a fantastic way to impress friends, save money, and enjoy the freshest ingredients without leaving your kitchen!
Q2: What are the essential ingredients I need to start rolling sushi?
A: Keep it simple! You’ll need sushi-grade rice, nori (seaweed sheets), fresh fish or veggies of your choice, rice vinegar, soy sauce, and some handy rolling tools like a bamboo mat. Don’t forget the wasabi and pickled ginger for that authentic kick!
Q3: How do I get the rice just right?
A: Perfect sushi rice is the heart of a great roll. Rinse the rice thoroughly until the water runs clear, then cook it gently and fluff it up. while it’s still warm, gently fold in sushi vinegar (a mix of rice vinegar, sugar, and salt) to give it that tangy, sticky texture that holds everything together beautifully.
Q4: What’s the secret to rolling sushi without it falling apart?
A: The magic lies in the bamboo rolling mat and a light touch! Lay your nori shiny-side down on the mat, spread a thin, even layer of rice, then layer your fillings. Use the mat to roll tightly but gently, applying firm pressure to create a compact, neat cylinder. Practise makes perfect!
Q5: can I experiment with non-traditional fillings?
A: Absolutely! Sushi is a canvas for your culinary imagination. Try roasted veggies, spicy tuna, cream cheese, mango, or even tempura shrimp. The key is balancing textures and flavors-think fresh, crunchy, creamy, and savory all in one bite.
Q6: How do I serve and store homemade sushi rolls?
A: Serve immediately for the freshest taste, accompanied by soy sauce, wasabi, and pickled ginger. If you must store leftovers, wrap them tightly in plastic wrap and refrigerate, but keep in mind sushi is best enjoyed fresh as rice tends to harden in the fridge.
Q7: Any tips to elevate my homemade sushi game?
A: Don’t rush the process! Master the rice first, then experiment with fillings and roll tight. Use sharp knives for clean cuts and keep a damp cloth handy to wipe your blade between slices. And most importantly-have fun and enjoy the art of sushi rolling!
Roll up your sleeves and dive into this tasty tradition-your perfect sushi roll awaits!
In Conclusion
Mastering the art of rolling your own sushi at home transforms a simple meal into a hands-on culinary adventure. With just a few essential ingredients,a bit of patience,and the easy steps outlined above,you can create sushi rolls that rival your favorite restaurant’s offerings. Beyond the delicious results, the process invites creativity-mix and match fillings, experiment with textures, and craft flavors that suit your unique palate. So roll up your sleeves, embrace the rhythm of the bamboo mat, and enjoy the satisfying journey from kitchen novice to sushi artisan. Your perfect sushi rolls await!